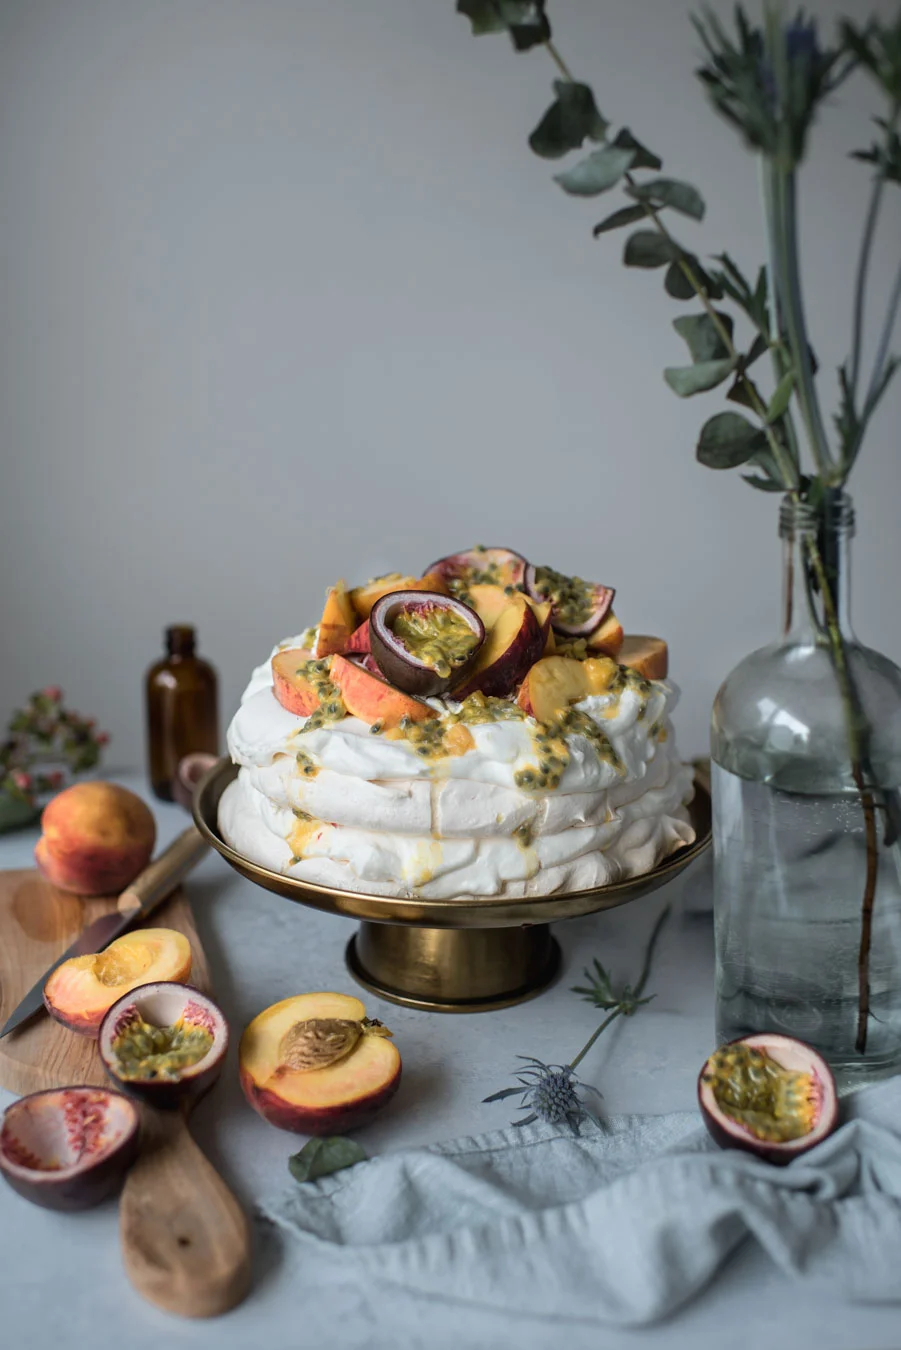
Peach + Passionfruit Pavlova { gluten-free }

A pavlova always makes a grand impression and this PEACH + PASSIONFRUIT PAVLOVA is probably my all time favourite version of the dessert! The sublime combination of juicy peaches and tart-sweet passionfruit, billowy whipped cream and chewy-crisp meringue, is certain to make you swoon.
I know some people approach pavlovas with some trepidation (I’ve been there) but they are actually not difficult to make once you know the little tricks. As always, my recipe includes a ton of details and all my tips — make sure to read my “ten tips for pavlova success” below! You’ll soon see that a pavlova really doesn’t take a lot of work since most of it is passive time spent baking and cooling off in the oven.
I have a sweet spot for this particular PEACH + PASSIONFRUIT PAVLOVA but there is never a bad pavlova. Use any seasonal fruit you desire. Ideally, you’ll want to balance the meringue’s sweetness by using fruit that have a touch of tartness such as strawberries and other berries, passionfruit, kiwi, mangos, oranges, and so many more. Personally, I lean away from very sweet fruit such as figs or bananas, or sweet toppings like chocolate. But it’s up to you! Remember, pavlovas are a fantastic dessert all year around, not just in the summer with which it’s typically associated. Case in point, my Winter Pavlova with Lemon Meyer Curd is also sublime. Let me know if you give this recipe a go and if you have any questions — I’m happy to help.
Eat well + be well,
Sonia x


[Updated May 2023 ]
recipe head notes - peach passionfruit pavlova:
1. Meringue: It's preferable to bake the meringue in advance and allow it to cool down gradually while still inside the oven overnight or as long as you can. The slow cooling down helps prevent collapsing and cracking. But don’t worry too much even if there is cracking or collapsing in the middle - this does happen and won’t affect the taste of the pavlova whatsoever.
2. Castor sugar: Aka superfine sugar can be store-bought or made by whizzing granulated sugar in the food processor until very fine. It is preferably to use superfine sugar in the meringue as it dissolves more quickly than granulated sugar, ensuring a smooth meringue.
3. Corn Starch: The cornstarch creates a chewier, less brittle texture in the baked meringue. I used to omit this out of practicality because I got out of the habit of having cornstarch in the house during our Paleo grain-free days. Without it, the pavlova is more crisp and brittle but is still wonderful and not blatantly noticeable under a pile of whipped cream and fruit. Now I buy organic corn starch and use it in this recipe.
4. Dairy-Free Alternative: The whipped cream can be replaced with coconut whipped cream or lemon curd like in my Winter Pavlova with Meyer Lemon Curd recipe.
5. What to do with orphaned egg yolks: You can make lemon (or other citrus) curd, crème brulée or ice cream. For savoury options, add the yolks to breakfast scramble or in addition to other whole eggs in fried rice for a richer flavour. You can also add a couple yolks to the mashed potatoes to top a Shepherd’s pie à la Gordon Ramsay.
Ten tips for pavlova success:
SQUEAKY CLEAN MIXING BOWL AND TOOLS:
Make sure your mixing bowl, whisk, spatula, hands, etc are all clean and free of any oil or water, which can interfere with the egg whites whisking up properly.
SEPARATE EGGS WHILE COLD:
Cold eggs separate a little bit more easily. for meringue to whip up properly, there must be no traces of egg yolk remaining in the whites.
USE A KITCHEN SCALE TO WEIGH EGG WHITES AND SUGAR:
Egg whites to sugar ratio is important for structurally sound meringue. I provide weight measurements in the recipe because it is the most accurate. A “large” egg can vary in size. I’m not saying you can’t make meringue without a scale, but it is a great way to ensure your white-to-sugar ratio is right.
USE SUPERFINE SUGAR:
Also called “caster sugar”, superfine sugar is simply sugar that has been processed to a finer ground than regular granulated sugar. The sugar helps with structure of the meringue so you want to ensure it is dissolved fully in the meringue for a glossy, stiff result. Rub a bit of meringue between your fingers to ensure it is smooth, glossy and free of any grit from undissolved sugar.
WHIP TO STIFF PEAKS:
Take the time to whip the meringue to a stiff peak. This means, when your whisk is lifted off the mixture, the meringue stands up on its own. A fun way to test is to flip mixing bowl upside down to confirm the meringue does not budge or slide out of the bowl.
FORMING THE MERINGUE FOR STABILITY:
Pavlovas come in various sizes and shapes. Shaping the meringue is probably the most fun and artistic part of the process. If you’re new to it and worried about cracking or collapsing, or perhaps you need your pavlova to hold it’s shape for more than a few hours, one option for more stability is to divide and bake the mixture as two flattened discs for a two-layered pavlova (as pictured in this blog post). Note that dividing into two thinner meringues discs means they bake up less marshmallowy in the center. But this becomes less and less noticeable as the meringue softens under the toppings anyway. Tip: if baking two meringues, confirm your two baking sheets can fit side-by-side in your oven. If you go with a single meringue layer, you can also shape it thicker and shorter, with a slight crater on top to fill with cream and fruit after baking.
BAKE LOW AND SLOW IN THE OVEN:
To minimize cracking during baking, the meringue is baked at a low temperature. Note that I preheat the oven to 275f and TURN IT DOWN TO 250f before placing meringue in the oven for baking. Alternatively, you may set the oven to 275f and keep it there. My oven tends to run hot so I prefer to turn it down. Either way, the point is to avoid too-rapid expansion of the meringue which can cause cracking.
COOL DOWN SLOWLY:
To prevent cracking, the baked meringue should also cool down to room temperature gradually. For this reason, I always bake my meringues the night before, turn off the oven and let them cool slowly overnight. If you don’t have the time, allow a minimum of 2 hours (but ideally at least 6 hours) to cool in the oven before taking it out of the oven to cool the rest of the way on a wire rack. In the event the meringue does crack or collapse, it will still taste amazing! You can also turn it into a Eton’s mess to hide the broken meringue.
TOP WITH CREAM AND FRUIT JUST BEFORE SERVING:
Even in the fridge, baked meringue will absorb moisture from the cream and fruit, becoming softer over time. To keep it crisp, leave your prepared whipped cream and fruit separate until just before serving. A second reason to assemble just before serving is the weight of cream and fruit may also cause the meringue to collapse after awhile.
avoid baking meringues on SUPER HUMID / WET DAYS:
Sorry to say this, but abort and find a Plan B if it is a super humid day 🥲 Humidity is the enemy of baked meringues! As mentioned above, baked meringue absorbs moisture from the toppings. They also absorb moisture from the air. On humid days, baked meringues don’t stand a chance against getting soggy. Once, I had dozens of mini pavlovas weep into soggy puddles because I brought them to a non air-conditioned party during a downpour. I’ll never forget that lesson. If you must still make it, make sure the environment is well air-conditioned! You can also freeze naked baked meringues to keep dry, if making ahead. They are delicate so make sure to use a hard container to protect them from getting crushed or banged around by other things in the freezer.
PEACH + PASSIONFRUIT PAVLOVA
Gluten-free. Makes one 8" cake that serves 8. I recommend reading my “ten tips for pavlova success” above before beginning.
Prep: 25 minutes | Bake: 1 hr 30 minutes | Cool: 2 hours up to 12 hours (overnight)
INGREDIENTS
For the meringue (note 1):
4 large fridge-cold egg whites (preferably weighed on a scale to 142g or 5 oz)
1 C (220g) superfine aka caster sugar (note 2)
1 tsp white vinegar OR pinch cream of tartar
1 tbsp cornstarch (note 3)
For the sweetened whipped cream:
1½ C (350ml) whipping cream aka heavy cream (note 4)
1-2 tbsp superfine caster sugar, to taste (I prefer less, to balance meringue’s sweetness)
½ tsp pure vanilla extract or vanilla bean paste
For topping the Peach Passionfruit Pavlova:
3-4 ripe peaches (or nectarines), pitted and cut into ½” wedge slices
5-6 passionfruits
METHOD
Prepare mixing bowl and whisk: Take out a large bowl or stand mixer bowl and whisk attachment. Make sure everything is completely clean and free of any grease or water.
Separate egg whites: While eggs are still cold (for easier separation), separate whites from yolks. Keep the yolks to use for something else – see note 5 for ideas. Tip: Be careful not to get a single drop of yolk in the whites. Egg whites contaminated with yolk will not whip up properly. If you need to be extra careful, separate one egg at a time into a small bowl first and only place uncontaminated whites in your stand mixer bowl. If time permits, allow egg whites to come to room temperature – this helps them whip up fluffier.
Preheat oven and baking sheet(s): Preheat oven to 275f (**note** you will turn this down to 250f later, before placing meringue in the oven). For this recipe, you have the option to bake pavlova into two-layer cake (pictured in this blog post) or single layer cake, mounded as a dome like my Winter Pavlova with Lemon Curd). To bake two meringue layers, check to confirm your two baking sheets fit side-by-side on your oven rack. Line baking sheet(s) with parchment paper. Draw an 8" circle on each parchment and flip drawn-side down on the baking sheet.
Prepare meringue: Whisk egg whites on medium-high (level 6 on my KitchenAid stand mixer) past foamy stage to soft peaks. “Soft peaks” means peaks are just starting to hold but doesn't stand on their own beyond a couple of seconds (this theKitchn post provides a great visual guide for soft, medium and firm peaks). Add sugar by tablespoons as you continue whisking. After all sugar is in, stop mixer to scrape bowl down once. Then turn to high speed (level 8) and continue beating 3-4 minutes more or until thick and glossy, and sugar is completely dissolved. Confirm by rubbing a bit of meringue between your fingers – there should be little to no grit. Fold in vinegar or cream of tartar and corn starch. Mix well but don’t over mix and risk deflating the meringue.
Form and bake meringue: Dab a bit of meringue on four corners to “glue” undersides of the parchment to baking sheets to prevent lifting when you form the pavlova. Scoop about half the meringue onto the center of one drawn circle. Push and shape into a flattened disc within the 8” circle. Repeat with the remaining half of the meringue on the other baking sheet. Or if making single-layer pavlova, form into a taller dome within the 8” circle. Use spatula to create desired design. Place baking sheet(s) gently into oven and close oven door. **TURN OVEN DOWN TO 250 f**. Bake without peeking for 1.5 hours. Turn oven off. Turn on oven light if that’s an option. Allow the pavlova to gradually cool inside the oven like that at least 2 hours up but preferably longer up to overnight. If in a hurry, it’s possible to cool it down out of the oven on a wire rack but it will definitely crack more if not given a chance to cool down very gradually.
Prepare Sweetened Whipped Cream: Add cream into the clean bowl of a stand mixer fitted with whisk attachment. Start whisking cream at low speed gradually increasing to high, until it has started to thicken. Add sugar and vanilla extract. Whip on medium speed until thick and billowy soft peaks. Be careful not to over whip. It should only take between 1-3 minutes depending on your machine.
Assemble (do this as close to serving as possible, up to several hours in advance): Place one meringue circle on serving plate or cake stand. Spread half the whipped cream all over. Add second meringue circle and spread remaining whipped cream on top. Arrange peach slices and scoop passionfruit pulp all over or you may keep a few passionfruit halves intact for presentation. Serve and watch everyone swoon over its heavenly goodness!
🎥 watch pavlova video:
If you like this recipe, pin it to Pinterest! I’d love to know in the comments below what you think of this post :)


Hi, I’m Sonia
I share recipes inspired by my food cravings and what I make for my family. My role as a working mom of two girls, my life in Toronto Canada and my background as a Chinese immigrant from Hong Kong all inform the things I love, crave and create. This means an emphasis on wholesome recipes that are approachable for busy weeknights and fun recipes to make on weekends and for friends!
homemade food to nourish and indulge …
More about Sonia >