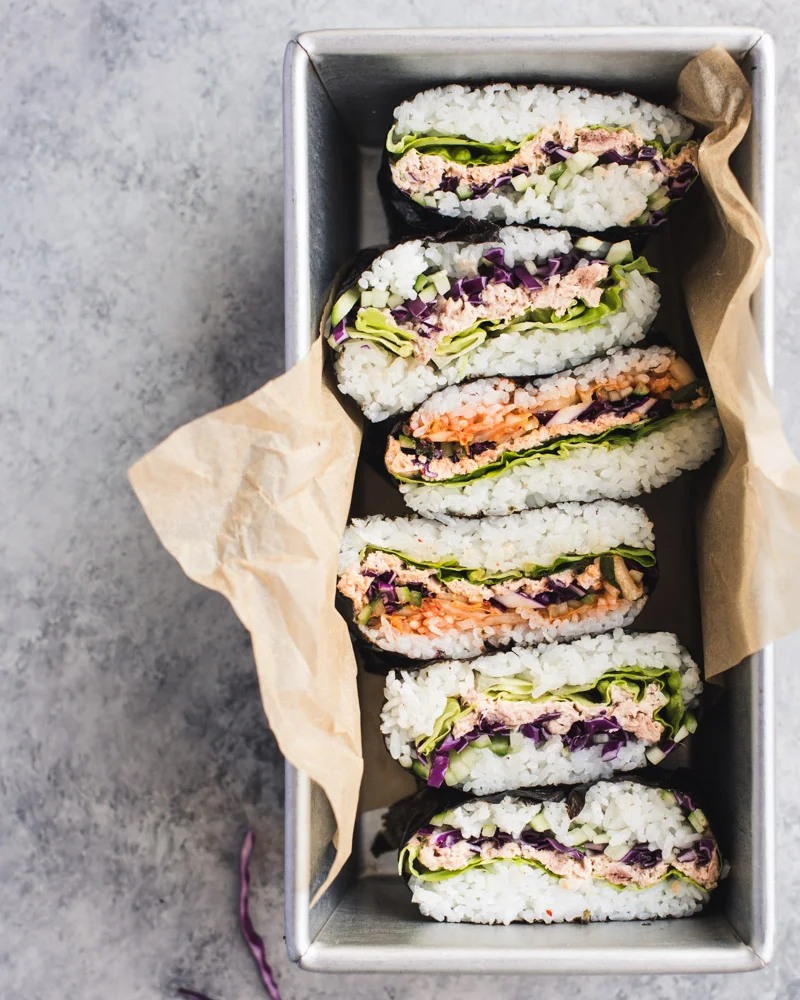
Here’s an easy, healthy, minimal-cook meal idea for weeknight dinner, not-a-sad-desk-lunch or kid school lunch. This recipe for TUNA AND KIMCHI ONIGIRAZU is a must try…they are simple to make and so, sooo delicious.
Onigirazu is a spin-off of the traditional Japanese rice ball, onigiri. If you’ve been to Japan or Japanese grocery stores, you have most likely seen or eaten onigiri — hand-held little nori-wrapped rice with fillings inside. Onigirazu is like the cousin, aka “sushi sandwich”. What I love about onigirazu is how you can stuff lots of filling inside to make them into proper meals. Filling wise, these are as versatile as any sandwich. This iteration with canned tuna, veggies and kimchi is our go-to. Other fillings we enjoy include egg (hardboiled or scrambled), avocado, marinaded firm tofu, julienned carrots, sautéed mushrooms, sautéed spinach, grilled meats (leftovers), etc. etc.
I always prep extra ingredients to pack school lunches for them the next day as well — read recipe head notes for making in advance. Besides loving to eat them, the girls get a kick out of showing these off in the lunch room at school because they always draw curiosity and comments from classmates and teachers 😋
Eat well + be well,
Sonia x
Step-By-Step images — How To Wrap Onigirazu:


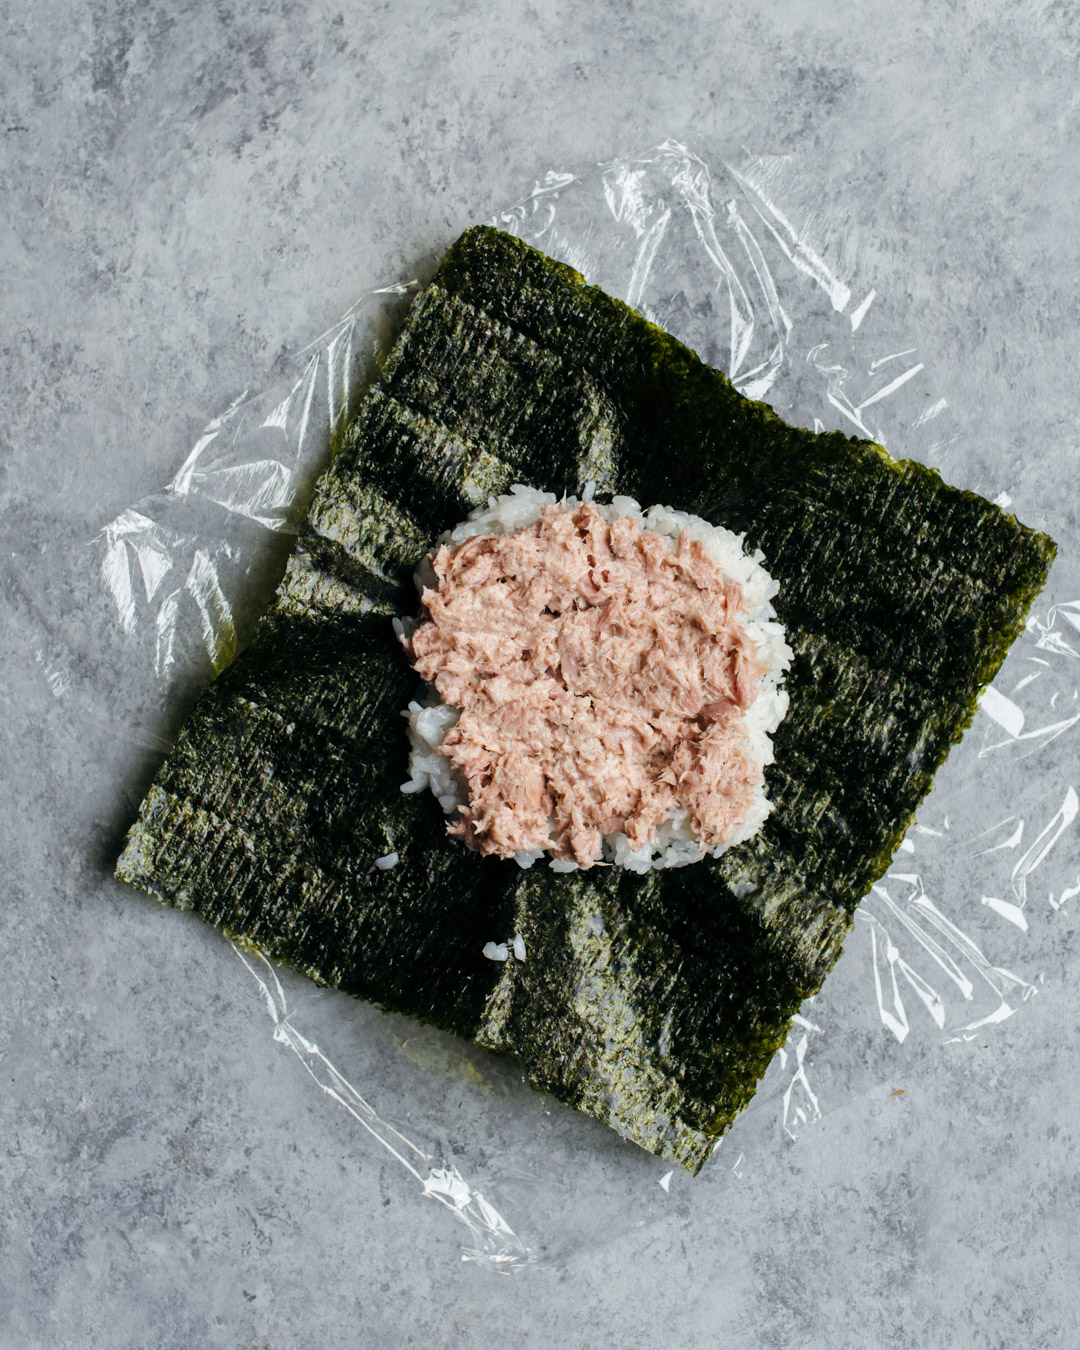
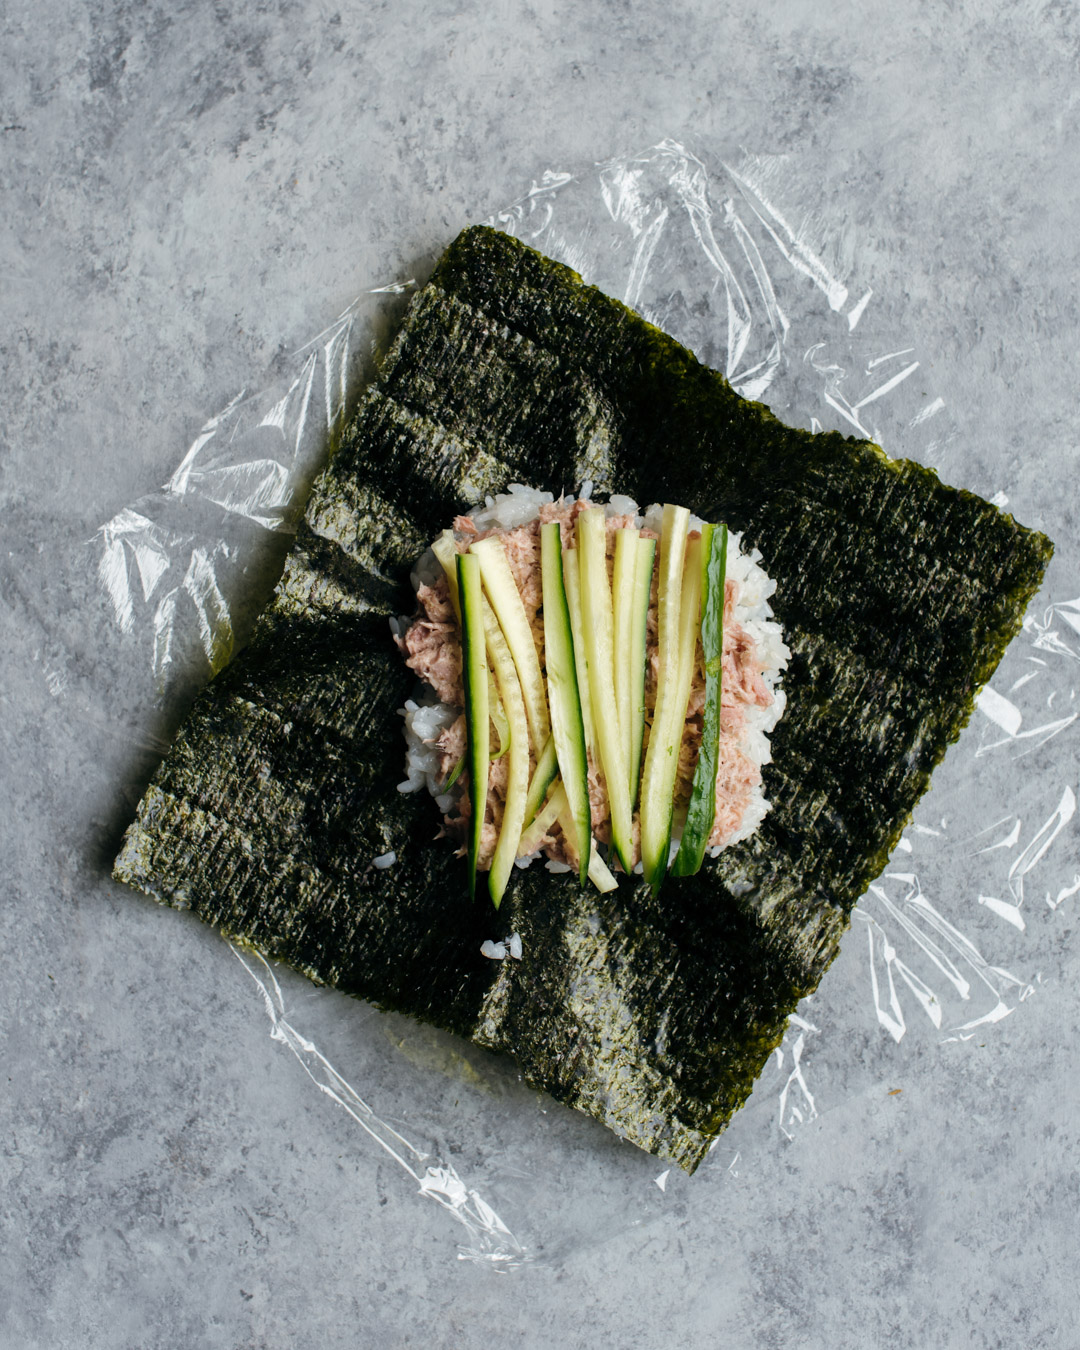

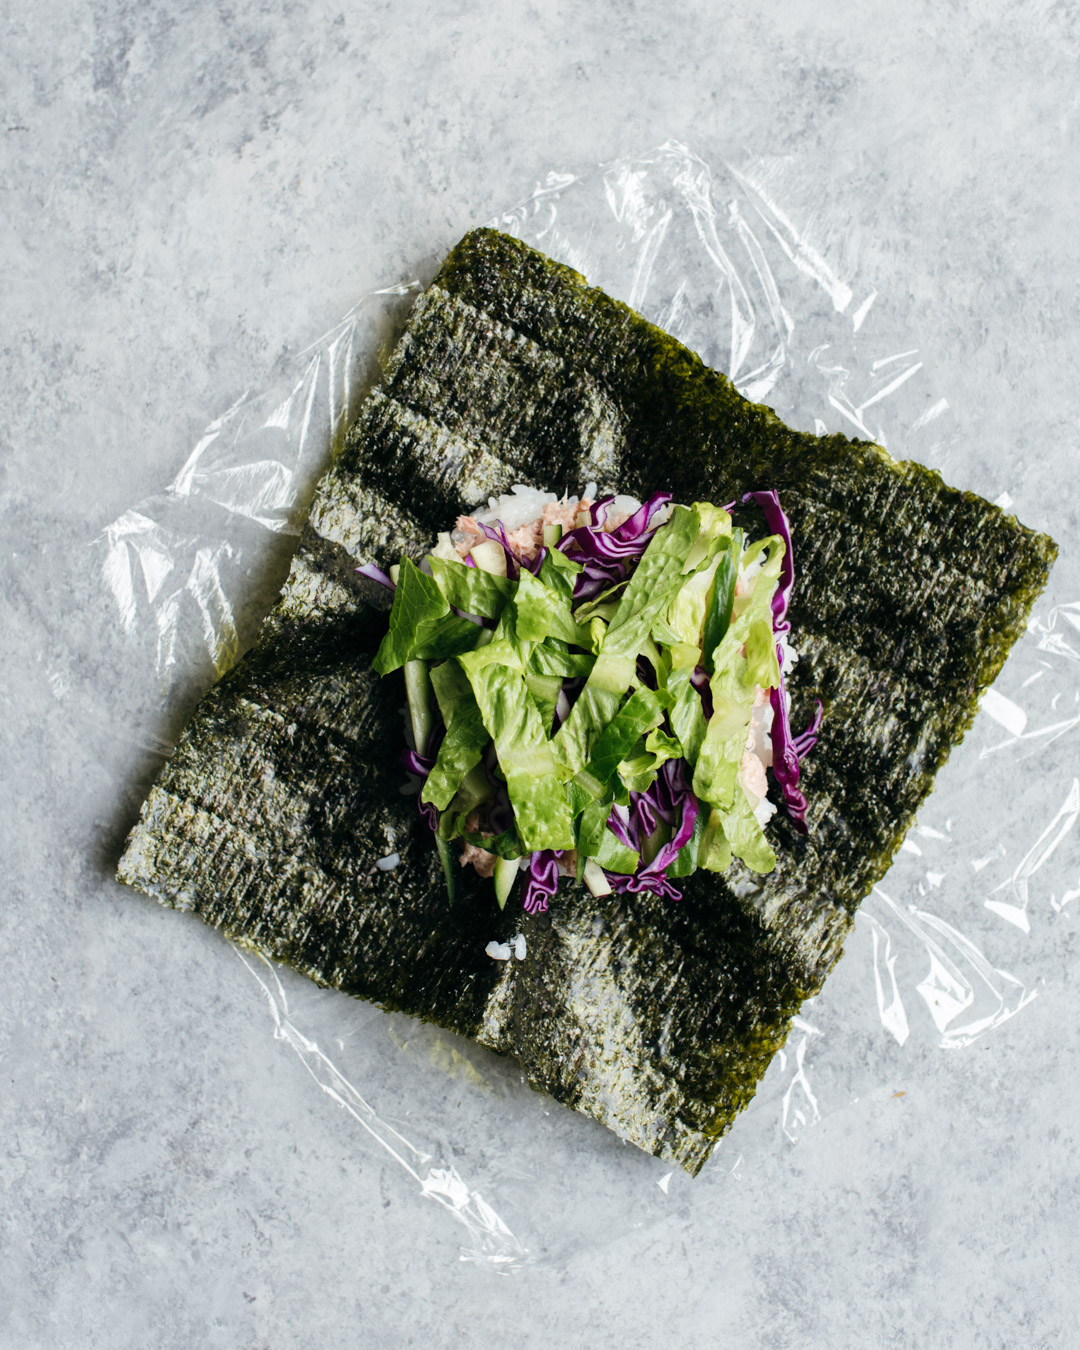
Tip: the plastic cling wrap helps to hold everything in place while the warm rice softens and shapes the onigirazu. After a minute or less (depending how warm your rice is), the plastic wrap can be removed and the onigirazu will hold it’s shape. I always re-use the same piece of plastic over and over until I’ve assembled all four onigirazu.


tuna and kimchi onigirazu - recipe head notes:
1.can I use plain rice (i.e. no seasoning) in onigirazu?
some people like to use vinegared rice (just like sushi rice) in their onigirazu and some people use plain rice. I personally love the added flavour of the seasonings but you can decide to season or leave the rice plain! [April 2023: please read notes 4 and 5 below regarding safe handling of rice.]
2.what is mirin?
Mirin is Japanese fermented sweet rice wine. Similar to sake, mirin is also a rice wine but with higher sugar and less alcohol. The real deal mirin is made from sweet rice and rice koji. That’s what you should look for in the ingredients list, along with water and sea salt. Avoid the cheap version containing glucose syrup and/or corn syrup. You can find mirin in Japanese and other East Asian grocery stores, online (ie. Amazon) and in the International aisle of well-stocked grocery stores. Even if you don’t frequent asian stores, Eden Foods (an American company) makes an organic mirin which is available in Canada and the U.S.
3.i don’t have mirin. can I omit it?
Yes, the mirin can be omitted from the rice seasoning. While I do love the mirin for added depth of flavour, it is not always present in sushi rice. The vinegar, sugar and salt will give the rice a balanced flavour without the mirin so don’t go out of your way to get it for this recipe.
4. can the rice be made in advance?
You can cook plain rice in advance and keep it hot (at 140f or above) to prevent bacteria growth. [April 2023 additional notes added regarding rice safety: At room temperature, cooked plain rice can be safe for up to 2 hours (source). The vinegar in the seasoning mixture reduces the pH and actually helps prolong the length of time it is safe (acidified rice with ph < 4.6 inhibits growth of pathogenic bacteria - source). But since we typically are not testing ph in home kitchens, I suggest playing it safe and keeping under (or close to) the 2-hour guideline even for vinegared sushi rice. Keep the cooked rice hot until ready to assemble onigirazu.]
5. how long can the onigirazu be made in advance?
All the filling components (i.e. tuna, cucumber, shredded purple cabbage, etc) and the rice itself can all be prepared in advance. However, it is best to assemble as close to eating as possible as the heat from warm rice softens the nori/seaweed over time. That being said, I prepare them in the mornings for school lunches (about 4 hours between assembly time to consumption) and the nori holds up well. [April 2023 additional notes added regarding rice safety: If planning to pack for lunch, definitely vinegar the rice per note 4 above. If using leftover rice (assuming you refrigerated it promptly after cooking/cooling), reheat in the microwave until hot (at least 165f - source) and allow to cool a touch before filling the nori. I have read guidelines indicating plain un-acidified rice being safe at room temperature for 2 hours (source) or 4 hours (source). To be safe, I suggest acidifying the rice if you plan to pack it for lunch, keep an ice pack with it and consume within 4 hours max if you’re comfortable, or within 2 hours.]
You May Also Be Interested in these other 30 Minute Recipes:
》spaghetti napolitan
》mushroom and egg “gyudon” japanese rice bowl recipe
》cucumber wrapped sushi rolls with smoked salmon and cream cheese
Tuna and Kimchi Onigirazu (Japanese Rice Sandwich)
{ gluten-free, dairy-free }
Ingredients:
For the seasoned sushi rice (see recipe head note 1):
4 cups cooked Japanese short grain rice (from approximately 2 1/3 cups uncooked grains)
¼ C rice vinegar
2 tbsp sugar
2 tsp salt
2 tbsp mirin – see recipe head note 2
For tuna mixture:
6 large sheets of nori / Japanese roasted seaweed
400g or 5 small tins of tuna, well drained
3 tbsp Japanese kewpie mayonnaise
drizzle of soy sauce
salt and pepper to taste
For assembling onigirazu:
2 C shredded romaine lettuce (or other leafy green of choice)
1 C shredded purple cabbage
1/3 C julienned English cucumber
½ C Korean kimchi, drained
Roasted sesame seeds
METHOD:
Cook the rice as you normally do. I recommend washing until water runs clearer but not translucent, draining well and cooking with 1:1 ratio of rice to water. In my experience, this ratio works for Instant Pot pressure cooker, electric rice cooker and in a lidded pot on the stove. Once rice is done, fluff with a rice paddle. Mix seasoning ingredients together until the salt and sugar are dissolved. Sprinkle all over the rice, mixing gently to cover rice grains evenly. Keep cooked rice warm (but not piping hot) by covering with a clean kitchen towel until ready to assemble onigirazu.
Mix well-drained tuna in a bowl with mayonnaise, soy sauce, salt and pepper to taste.
To assemble [also see blog post step-by-step images]: lay down a square piece of plastic wrap and place a sheet of nori on top oriented like a diamond. Using a 1/3 cup measure, scoop 1/3 cup of warm rice in the center of the nori, gently spreading into a square. Leave enough room around all sides so the nori corners can fold in to cover the filling later.
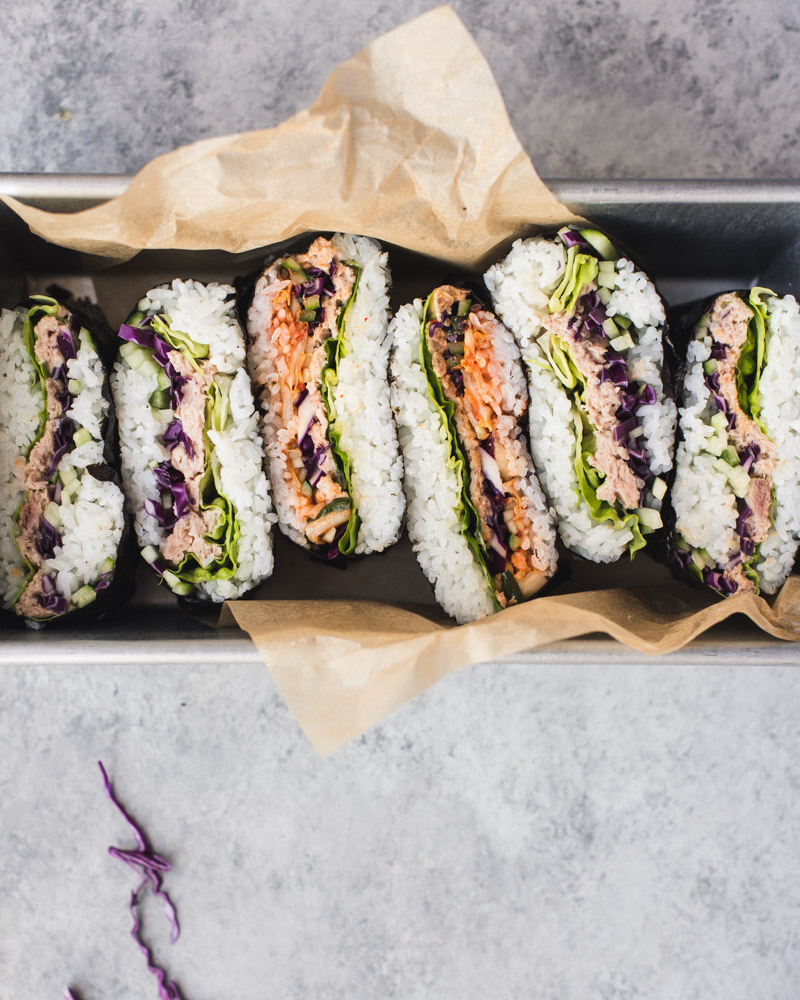
Continue layering on fillings: tuna mixture, julienned cucumber, shredded purple cabbage, shredded lettuce, kimchi and sesame seeds. Long items should be arranged in parallel to each other. Add enough fillings so the sandwich is fulsome but with sufficient room to fold the nori corners in with a bit of overlap to seal the fillings. Make a mental note of how the long veggies (cucumber and shredded cabbage) are arranged before closing the onigirazu, as you’ll want to cut it crosswise for a pretty reveal. Or you can eat it whole without cutting.
Fold up corners of the nori to fully enclose everything. Fold corners of the plastic wrap firmly around the formed onigirazu. Let rest for a minute – the heat from the rice gently softens and molds the nori so the sandwich stays in place. Unwrap, cut in half if desired, and enjoy!
🎥 watch tuna kimchi onigirazu video:

If you like this recipe, pin it to Pinterest!
Did you make this recipe? Tag me on Instagram at saltnpepperhere so I can see! Or let me know in comments below what you think of this recipe or if you have any questions. I am happy to help! x