Unicorn Carousel Cake { Vanilla Cake, Swiss Meringue Buttercream, Honeycomb Crunchies and Unicorn Sugar Cookies }
Vanilla cake with a plush, soft and tight crumb that is “not too sweet” with Swiss Meringue buttercream, honeycomb toffee crunchies and unicorn sugar cookies.
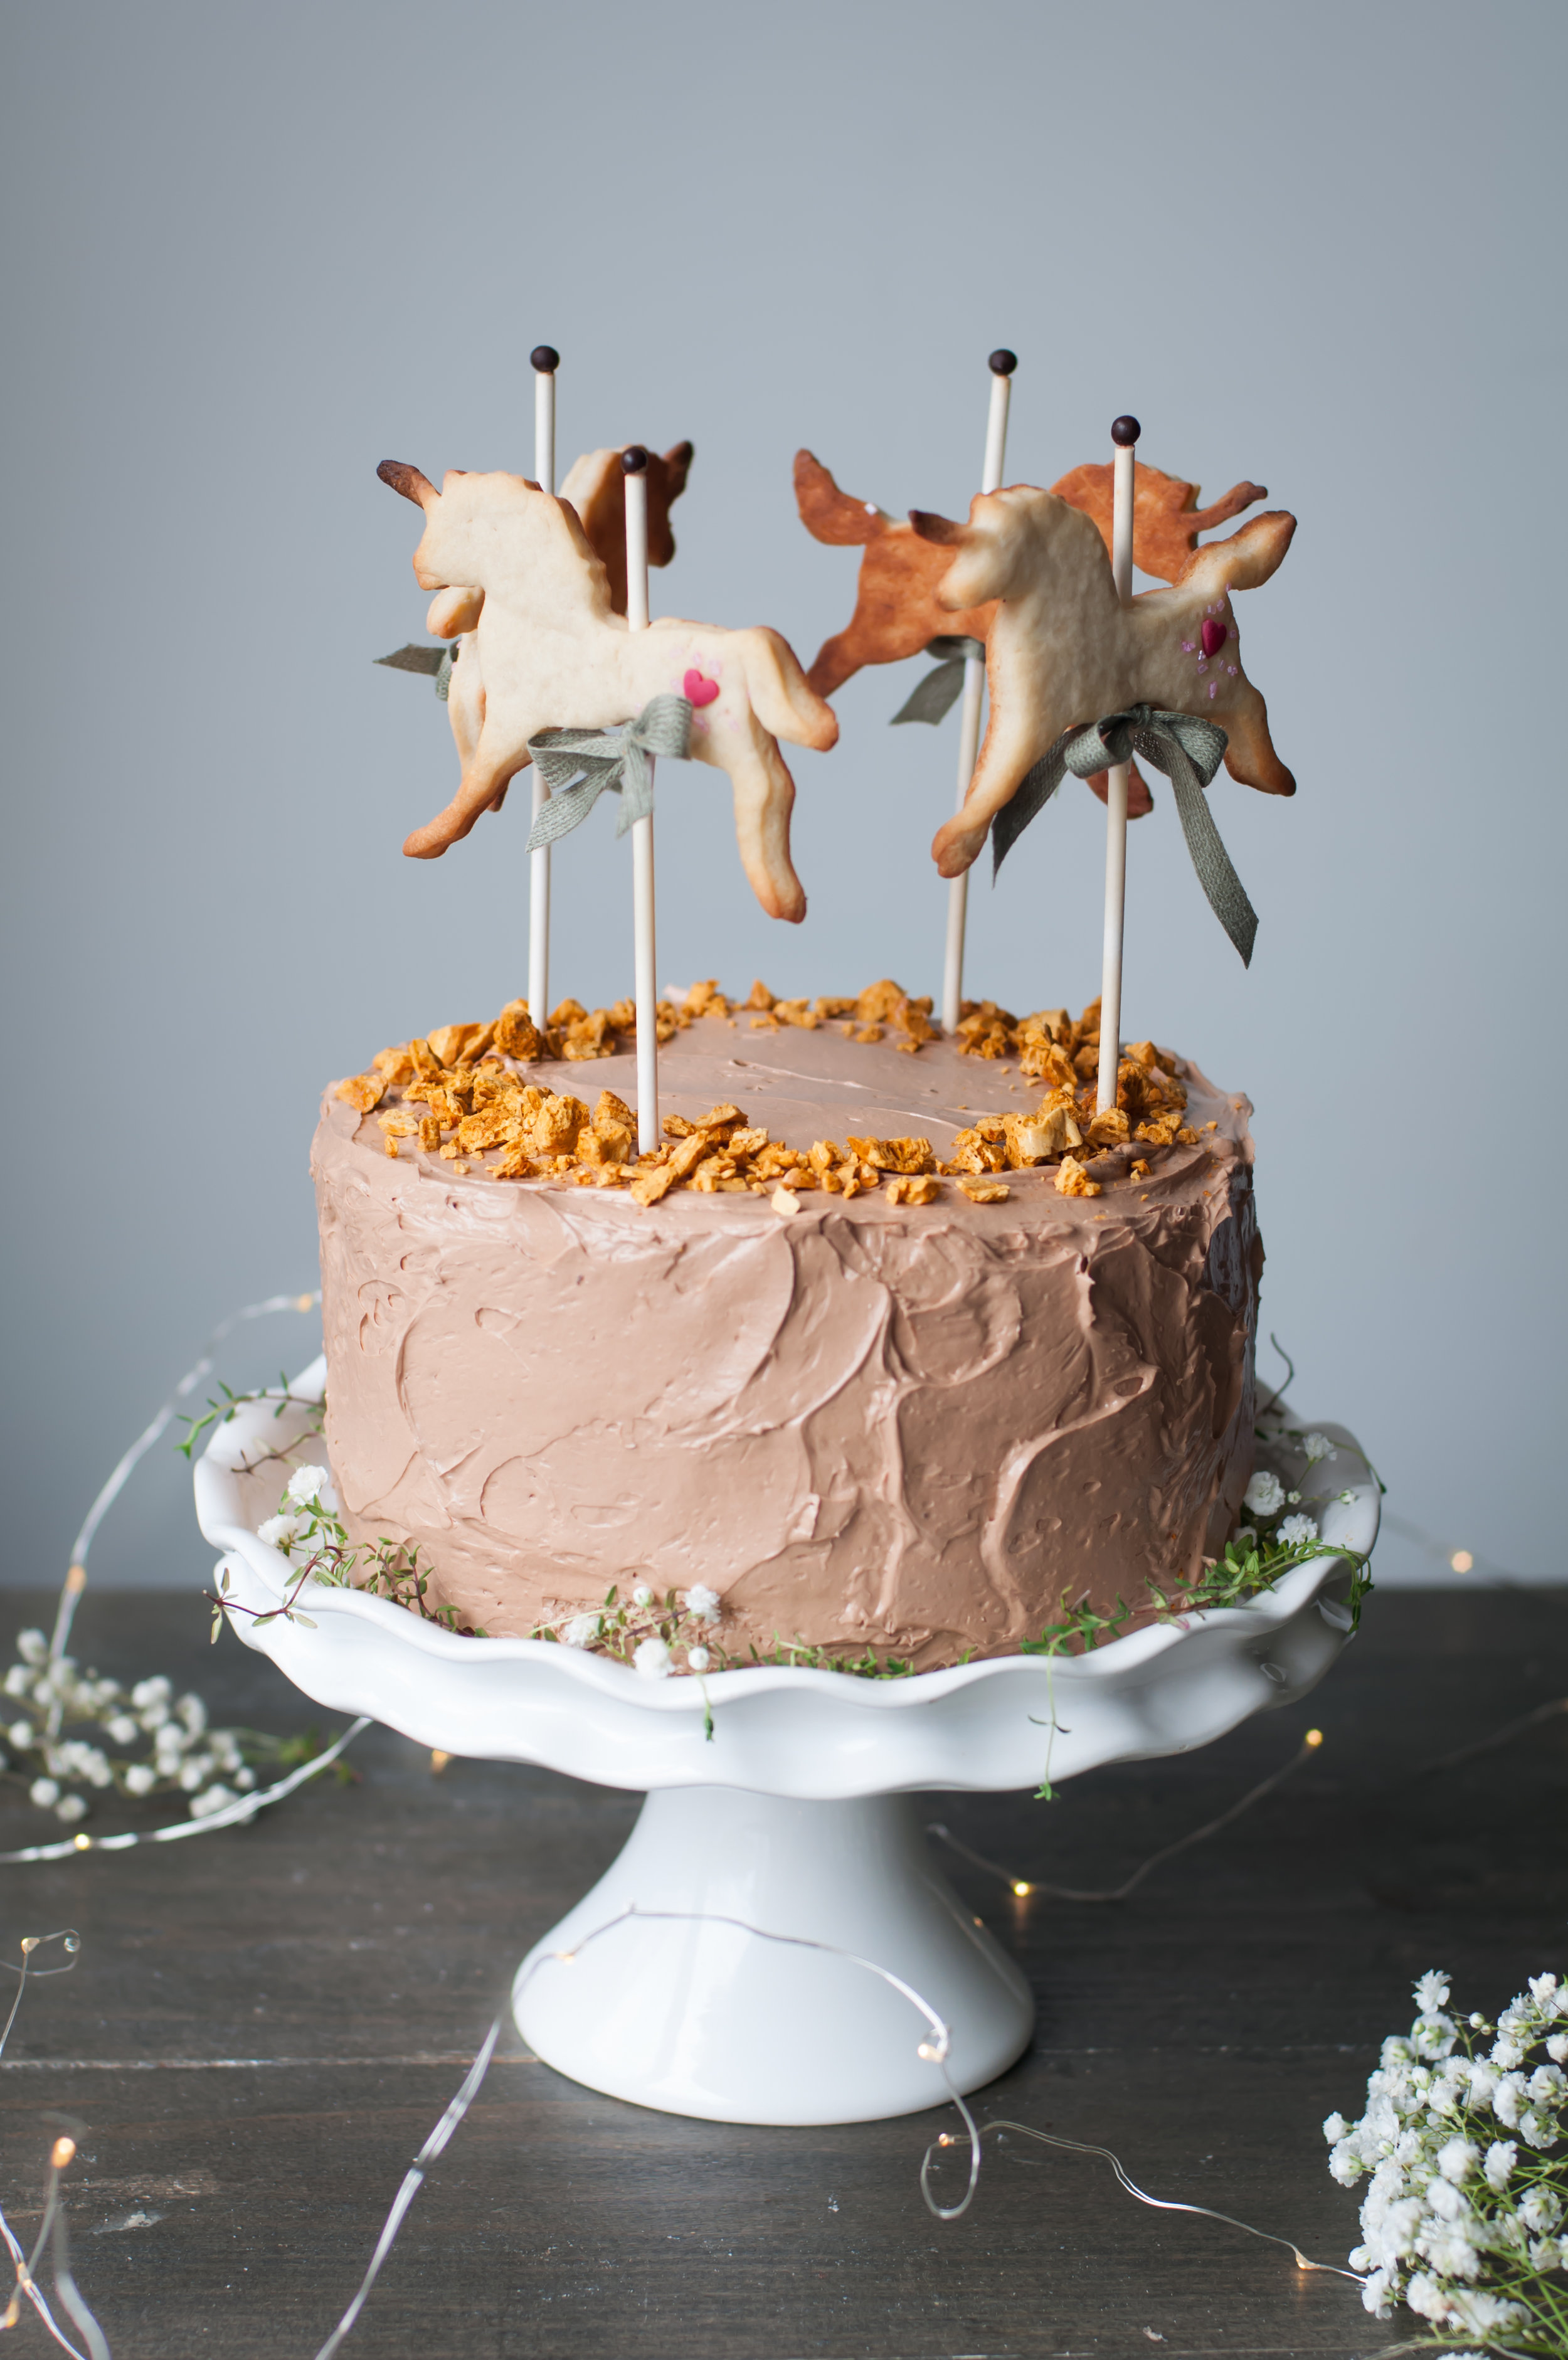
Every celebration cake I make feels special, of course. But this one was exceptionally special because I made it for my daughter's 6th birthday according to her precise specifications - “white cake with chocolate frosting and those crunchy yellow things on top”. It was extra extra special because we decided to suspend her usual dietary restrictions (grain and dairy) to thoroughly enjoy the celebration and all the trimmings that a young girl's birthday celebration should have, including a little unicorn magic and a damn good birthday cake.

Unicorns with uneven tan lines.
It's been a tough month for Aubrie with many of her favourite foods and weekend treats off the table for now as we attempt to figure out what (if) any foods are behind her chronic stomachaches and eczema. My heart broke in two when she came home from school, terribly sad, because her whole class enjoyed cupcakes brought in by a classmate while she and another gluten-free student watched. Kinda devastating for a first-grader.

The Swiss Meringue Buttercream has just a light kiss of chocolate, more as a way to add a soft brown colour than to be overtly chocolate-flavoured.
Needless to say, if we were having a cheat day for her birthday, I was determined to reward her with a cake that she would head-over-heels love. I found inspiration from one of her favourite cartoons My Little Ponies which stars a cast of pony, unicorn and alicorn (winged unicorns) characters. The little heart shaped sprinkle (all-natural ones I gleefully snagged at Eataly on a recent trip to NYC) represents the "cutie marks" each character has.

The legs, tails and horns are very delicate! I struggled to unmold them perfectly but the kids did not notice and were very delighted :)
Another thing about these tattooed unicorns is that it turns out unicorn cookies are tricky to make because of the skinny and fragile legs, tails and horns. It took major effort not to amputate them while unmolding. Make sure to chill your dough very firm before cutting and unmolding the shapes. And I guess since those same legs, tails and horns bake more quickly than the larger head and torso, they ended up with uneven tans.
Still, I was very happy with the way the unicorn carousel effect turned out! My two daughters loved it, farmer’s tan and all 😅

Not gonna lie, this is a lengthy recipe but take note of the make ahead instructions. Stagger the work over several days so it is less onerous. The recipe includes notes about storage and how long each component can be held so you can make them in stages.
I also included the ingredient amounts within the recipe card instructions for ease, so you don’t need to flip back and forth!
Eat well and be well,
Sonia x
Tips and FAQs
The batter is thick
The vanilla cake is an all-butter (no oil) recipe with a crumb that is rich and cakey, rather than light and fluffy, leaning a little towards the plushness of a pound cake. The cake batter is thick when spreading into cake pans but don’t worry, they will bake up just as it looks in the photos with a moist and plush crumb. The baked cake layers should be about 1¼” tall when baked in 8” round cake pans.
Why did my cakes bake up very thin / not rise?
The culprit for a dense cake that did not rise properly is likely that the baking powder and/or baking soda has expired. Tip: You can’t necessarily trust the “best before” date on the package. Always check your leaveners with a quick test (search online, it’s very simple) before baking especially if they haven’t been used for baking in awhile!
Make ahead / storage timelines
Swiss meringue buttercream can be kept room temperature for 3 to 4 days. If you want a more intense chocolate buttercream, increase the amount of dark chocolate bar up to 10 oz/ 300g
Honeycomb candy can be stored in an airtight container for 2 to 3 days. Avoid exposing it to moisture or humidity as the candy will start to dissolve.
Cooled cake layers can be wrapped in plastic and kept at room temperature for 3 to 4 hours. If keeping longer than, place wrapped cakes inside ziptop bags and refrigerate for a day or two, or freeze if keeping beyond two days.
Store sugar cookies in an airtight container at room temperature for up to 3 days, or in the refrigerator for up to a week. For longer storage, freeze cookies for up to three months in airtight freezer bags. Store carefully so the delicate horns, legs and tails don't break off.
Sugar cookie makes thirty six (36) 3" cookies, or fewer cookies if using a large cookie cutter like my unicorn one. If you only want to make 4 unicorn cookies for the cake and don't plan to serve the extra cookies right away, the unbaked cookie dough freezes beautifully! Flatten into a 1" disk and wrap tightly in plastic film inside a ziptop freezer bag. To use, defrost overnight in the fridge and take it out to warm up a bit on the counter shortly before rolling. I've froze mine that way for as long as 3 months and it bakes perfect.
The frosted cake can be stored in the fridge. The buttercream protects the cake from drying out. As soon as the buttercream is firm (after chilling 2 hours or so), cover the cake with food wrap. The cake can be stored like this for at least 24 hours.
To serve: Take the cake out of the fridge 3-4 hours before serving. The butter in the cake solidifies after chilling therefore bringing it to room temperature (or close to) ensures the cake layers are tender and plush.
Ideally, you’ll add the unicorn cookies and honeycomb crunchies on top of and around the cake as close to serving as possible since the honeycomb absorbs moisture and begins to soften over time. Add them when you take the cake out to room temperature.
Baking strips for flat cake layers with minimal or no doming (I swear by them!!)
Cake strips are basically wet strips wrapped around a cake pan that promotes even heat distribution during baking, leading to little to no doming of the cake layers. You can buy them (look for “cake strips”) or like me, simply cut up an old kitchen towel the thickness of your cake pans.
Wet the cake strips thoroughly (almost to the point of dripping) with tap water and wrap them around the cake pans, secured snuggly with a safety pin, right before filling with the cake batter. The wet strips will sizzle loudly when you first place the cake pans into the hot oven but don’t worry, they are fine.
With this vanilla cake recipe, the wet strips eliminates the need to level the cake layers before stacking, saving so much time and you’re guaranteed no lopsided cake.
Keep and re-use the strips every time you bake this cake or any cake!
Special Equipment
Lollipop sticks for the unicorn carousel. I used Wilton lollipop sticks NOT their cookie sticks which are thicker.
Unicorn Carousel Cake
{ Vanilla Cake with Swiss Meringue Buttercream, Honeycomb Crunchies and Unicorn Sugar Cookies }
Honeycomb recipe from Epicurious. Butter cookie recipe adapted from Land O'Lakes.

Vanilla Cake with Chocolate Swiss Meringue Buttercream and Honeycomb Crunchies
Vanilla cake layers with a moist and dense yet soft crumb (that isn't too sweet) are covered in a Swiss Meringue buttercream that is lightly kissed with chocolate. I topped the cake with honeycomb crunchies and decorated it like a carousel of unicorns for a special little girl's 6th birthday! This is a lengthy recipe because of the components but you can stagger the work by spreading it over 2 to 3 days.
Ingredients
Instructions
- Over a double boiler, whisk granulated sugar and egg whites, stirring constantly, until mixture reaches 115°F (46°C) or you can feel between your fingers that the sugar grains are completely dissolved.
- Pour mixture into metal bowl of stand mixer fitted with the whisk attachment. Starting on medium speed to avoid splashing, gradually increase speed to high and whip until thick, glossy and white (very firm peaks), about 4 minutes.
- Meanwhile, sift confectioner's sugar. Once egg white sugar mixture is done, turn down to lowest speed and add confectioner's sugar all at once. Let the whisk turn a few times to settle the sugar before increasing speed to medium-high and whisking until evenly mixed.
- While mixer is still running on medium-high, add room temperature butter in 2 to 3 additions. Add vanilla extract. Mix until thoroughly combined. Add the cooled, melted chocolate. Switch to the paddle attachment and mix on low speed until buttercream is very smooth, about a minute.
- Swiss meringue buttercream can be stored at room temperature for 3 to 4 days.
- Line a 8 inch square baking pan with lightly oiled foil. Half fill the sink with cold water and have ready a whisk and the baking soda. Place the sugar, syrup, cream of tartar, vinegar and 5 tablespoons of water into a medium-sized pot. Set over medium heat, stirring until sugar has dissolved, then bring the mixture to a boil. Continue to cook until the mixture turns amber-colored and reaches "hard crack" stage, or 300°F (154°C) on a candy thermometer.
- As soon as the caramel reaches the right temperature, remove pot from heat and plunge into the sink of cold water to speed up the cooling process. Working quickly, pour baking soda into the caramel and whisk to combine evenly. Note - the mixture will foam up like a mini volcano! Pour into prepared pan in an even layer and let cool.
- Honeycomb candy can be stored in an airtight container for 2 to 3 days.
- Preheat oven 350°F (175°C). Lightly grease and line with parchment, three 8" round cake pans.
- Optional: wrap the cake pans in wet towel strips to minimize doming during baking.
- In a large bowl, whisk together dry ingredients: all purpose flour, baking powder, baking soda and salt. Set aside.
- In a stand mixer with the paddle attachment, beat the butter until smooth & creamy, about 1 minute. Add sugar and beat on high speed for 5 minutes or whenever creamed very well. Scrap down sides.
- On medium-high speed, add 1 whole egg at a time, beating well after each addition until all four whole eggs are mixed in. Beat in vanilla. Scrap down sides.
- On low speed, add dry ingredients in 3 additions, alternating with the buttermilk. Do not overmix! The batter should be smooth, velvety and slightly thick. Transfer to the large bowl that previously held the dry ingredients.
- Change to the whisk attachment on the stand mixer. Vigorously beat the 2 egg whites until thick and foamy, about 3 minutes. Fold egg whites gently into batter. Dig the spatula all the way to the bottom of the bowl a few times to ensure everything is mixed well.
- Divide equally into prepared cake pans and bake 22 to 25 minutes. Insert a toothpick in center of cake to test doneness - it should come out dry. Do not overbake. Since ovens vary so much, always test doneness a few minutes prior to the stated bake time for any recipes you're making for the first time.
- Cool cakes I'm the pans for 30 minutes, then run a dull knife or offset spatula around the edges to loosen. Remove parchment and cool cakes on wire racks until fully cooled.
- Fully cooled cake layers can be wrapped in plastic and kept at room temperature for 3 to 4 hours. If keeping longer than, place wrapped cakes inside ziptop bags and refrigerate for a day or two, or freeze if keeping beyond two days.
- Combine butter, sugar and egg in the bowl of a stand mixer. Beat at medium speed, scraping bowl often, until creamy. Add orange juice, vanilla extract and rose water. Beat until well mixed. Add flour and baking powder. Resume beating at low speed until well mixed, scraping the bowl once or twice during this process.
- Divide dough into thirds. Shape each third into a ball and flatten slightly. Wrap in plastic and refrigerate 2 hours or until firm.
- Heat oven to 400°F (200°C).
- Roll out one ball of dough at a time (keeping remaining dough refrigerated), on lightly floured surface to 1/4-inch thickness. For cookies you plan to put on a stick, make sure the dough is slightly thicker than the candy stick. Cut with cookie cutters.
- Carefully insert the candy stick straight up into the lower side of the unicorn torso, leaving about 3/4 inch at the top of the torso. Space cut cookies onto ungreased cookie sheets. I found it easiest to stagger them, right side up and upside down, to save space but making sure at least 1 inch clearance on all sides of the cookie for spreading during baking. (To save time, I only did this for 4 unicorns and no stick for the remaining cookies). Decorate with sprinkles, if desired.
- Bake 7-10 minutes or until edges are lightly browned. To prevent the darkened unicorn legs and horns that mine had, you may choose to add a small piece of foil to tent those areas partway through baking.
- Let stand 1 minute on cookie sheet. Carefully transfer to wire rack to cool completely.
- If needed, level out the tops of cooled cake layers with a long serrated knife. If you used the wet towel trick, then you should be able to skip this step or have minimal doming to level off.
- On a cake board or cake stand lined with 2 to 3 strips of parchment (staggered in a circle that can be removed once the frosting is done), place bottom cake layer in the centre, right-side up. Scoop 1 cup of buttercream onto the cake and spread evenly with an offset spatula. Repeat with second and third layers, stacking the third layer upside-down so the cake bottom creates a nice flat top. Make sure all the layers line up nicely before continuing.
- Frost the top and sides of the cake with remaining buttercream. For a prettier finish, do a crumb coat first - that is, spread a thin layer of buttercream (about 1 cup) and refrigerate for 15 minutes (but not longer) to firm up. Then spread the remaining buttercream. Decorate the top with honeycomb bits and insert the unicorn cookies to create the carousel effect.
- Tip: To ensure the unicorns didn't slide down over time, I wrapped a tiny piece of scotch tape twice around the stick just under the torso, and tied a ribbon to conceal it. Worked like a charm!
Notes
Recipe makes one 8" 3-layer cake, 6 cups of buttercream (which very generously frosts the cake; I had leftover) and 36 regular cookies or fewer large unicorn cookies.
Nutrition Facts
Calories
1031Fat
61 gSat. Fat
37 gCarbs
129 gFiber
2 gNet carbs
112 gSugar
75 gProtein
11 gSodium
469 mgCholesterol
204 mgDisclaimer: nutritional information is auto-generated and should only be used as an approximation.
This recipe was updated in September 2025 with tweaks for improvements and clarity.
